Make Open Granny Squares in 10 Minutes For Beginners (UK & US)!
As an Amazon Associate I earn from qualifying purchases
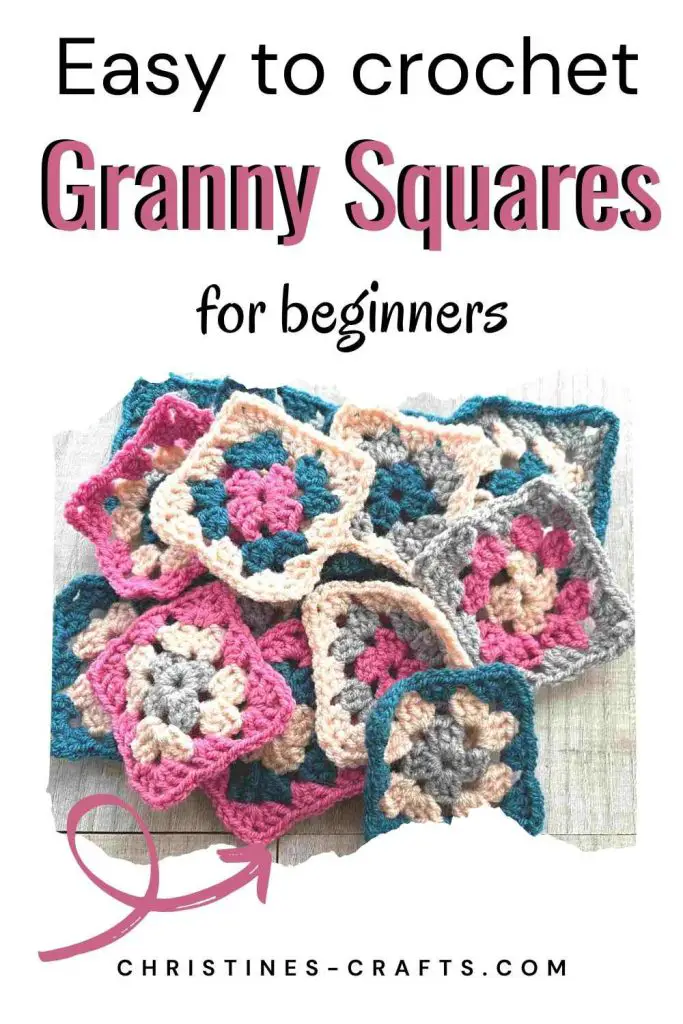
Welcome to the wonderful world of granny squares! This tutorial will guide you through creating a traditional open granny square, perfect for beginners who have some basic crochet experience. Granny squares are a versatile foundation for countless projects, from blankets to scarves and even pouches and cardigans!
I love granny squares and have been making them since I was a child. For many years it was the only crocheting I knew!
There are many different types of granny squares, including solid granny squares, flower granny squares, and more complex variations. This tutorial focuses on the classic open granny square, which is a great place to start your granny square journey.
If you need to learn how to join your granny squares easily then this tutorial will show you how. I have made a small bag with granny squares and you can too here.
These instructions are in UK and US terms and there are step by step instructions and abbreviated versions to guide you once you are confident.
This page contains affiliate links meaning I earn a little commission if you use those links at no cost to you. I only recommend brands I use and trust.
Table of Contents
You will need
Abbreviations
UK Version Instructions
Abbreviated Instructions – UK Version
US Version Instructions
Abbreviated Instructions – US Version
FAQs
And next …
You will need:
- Crochet hook – I am using 4mm (US size 8)
- Yarn – I am using DK but you can try anything you have already
- Scissors


Abbreviations
- ch: chain
- sc: single crochet
- dc: double crochet
- tr: treble crochet
- sl st: slip stitch
Video Tutorial
This video is also available on my YouTube channel.
UK Version Instructions for Granny Square
Getting Started
I choose to start my granny squares with chain stitches but if your prefer you can use a magic ring. If you are doing this granny square exactly the same as me then do 6 chain stitches and join them with a slip stitch to form a ring.
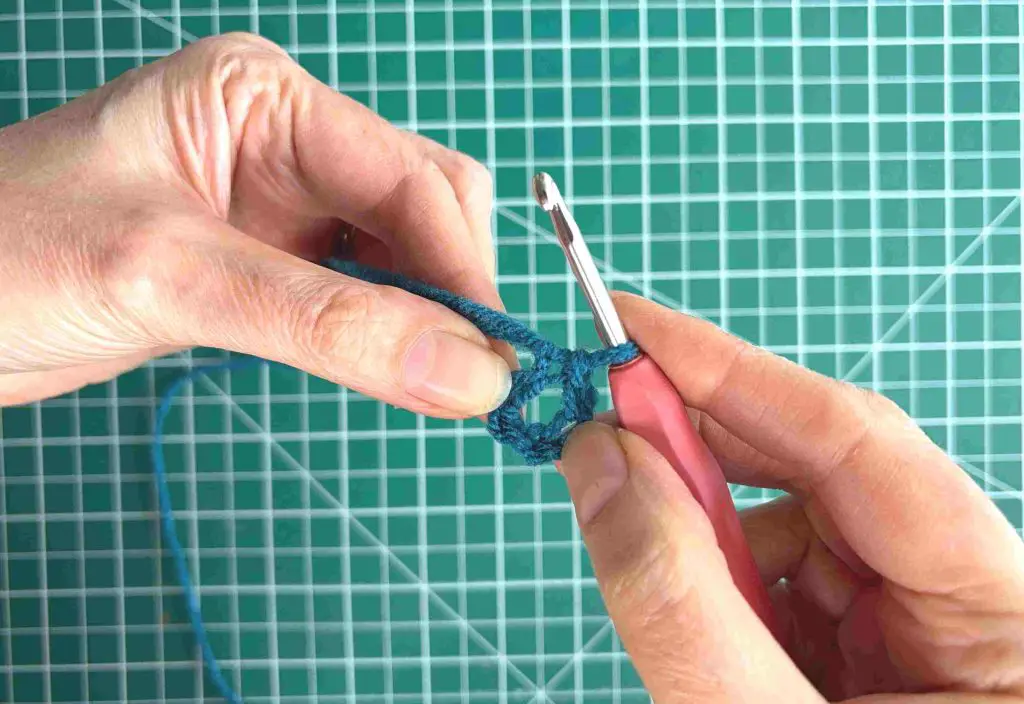
Round 1
Work 3 chain stitches (these are your first ‘treble’). Work 2 treble stitches into the ring.
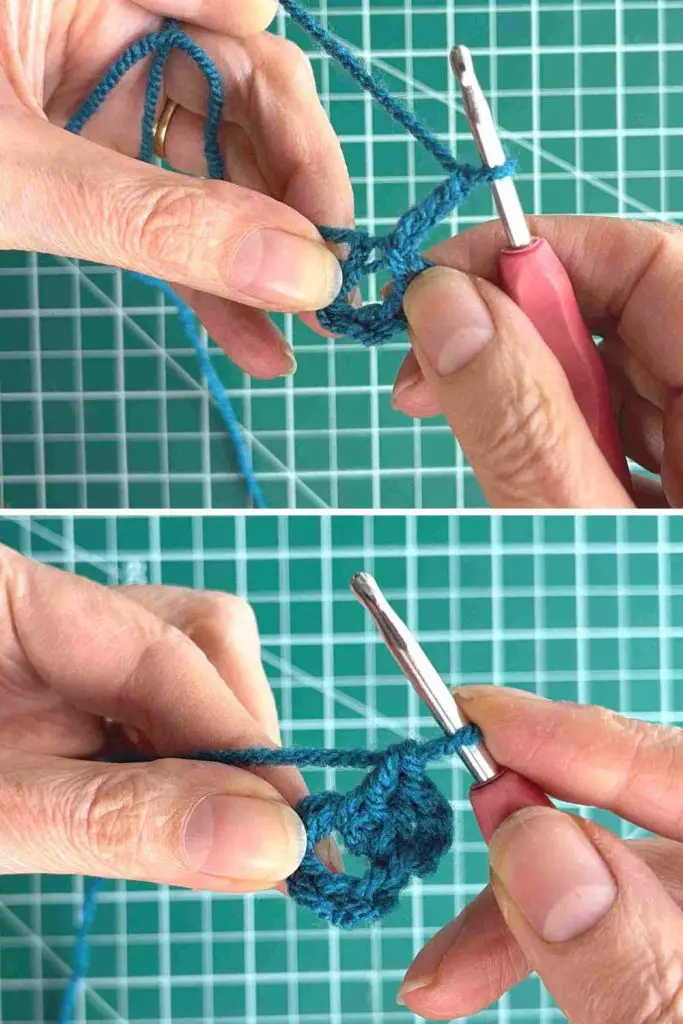
Then work 3 more chains and another 3 trebles into the ring
Repeat chain 3, treble 3 twice more. Then slip stitch into the top of the first 3 chain stitches to complete the round. You should have 4 corners made using your 3 chain stitches and 4 sides using your 3 trebles. Basically, you now have a square.
If you are swapping to a new colour, fasten off your yarn.
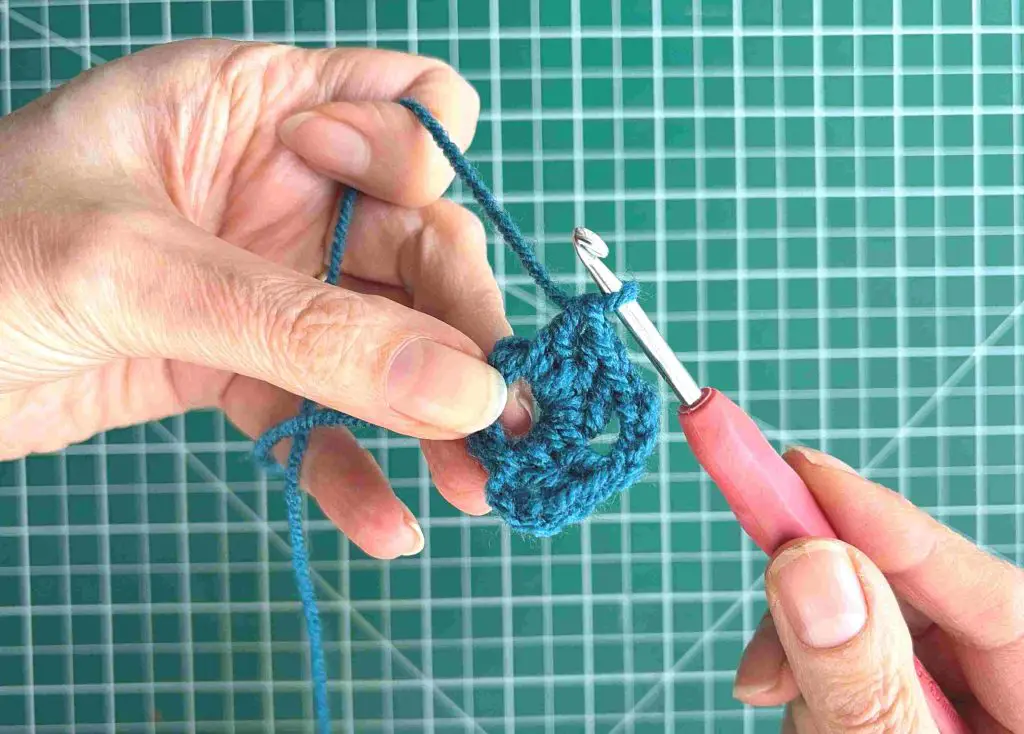
Round 2
Join your new colour yarn into any corner space. Work 3 chain stitches and 2 trebles as you did before. Then do 3 chains and 2 trebles into the same corner space to form your first corner of round 2.
Do 1 chain stitch and then work the next corner in the same way. So, do 3 trebles, 3 chains, 3 trebles into the next corner space.
Repeat this for all the corners. Then, chain 1 and slip stitch into the top of the first chain to complete round 2.
If you are changing colour then fasten off your yarn. By now you should be seeing the pattern developing and the repetition required to make granny squares. They can be so relaxing to crochet.
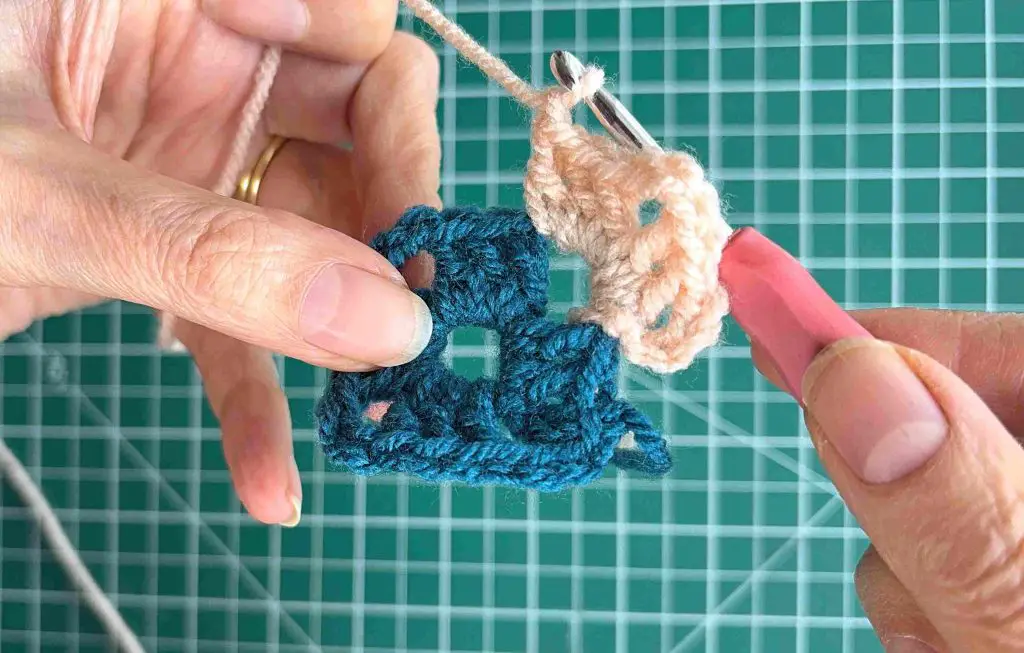
Round 3
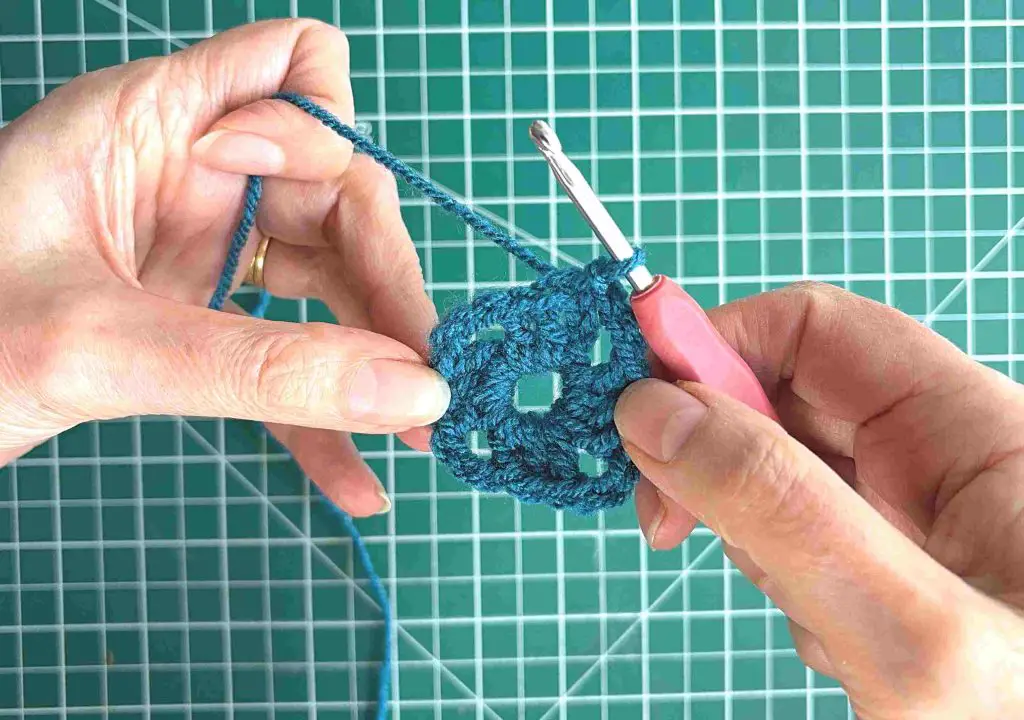
This is the last round that I am showing you as every round after this is worked in exactly the same way.
Join your new yarn in any corner space. Work 3 chains, 2 trebles, 3 chains, and 3 trebles as you did when you started round 2.
Chain 1, work 2 trebles into the next chain space. Then chain 1 and work the corner space as before (3 trebles, 3 chains, 3 trebles).
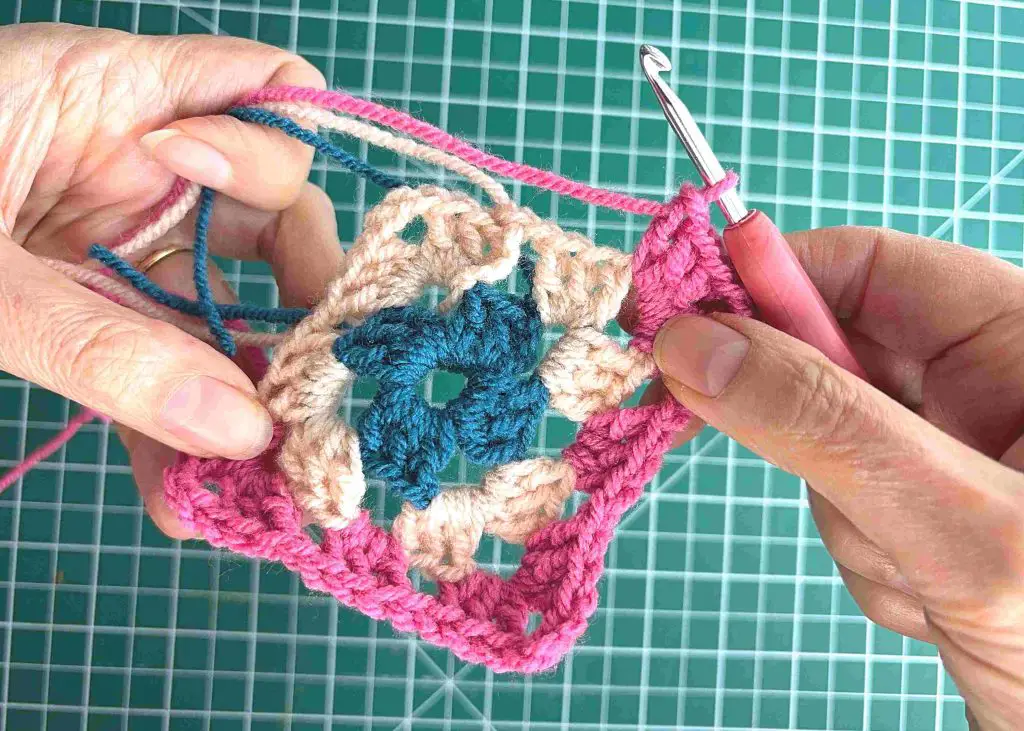
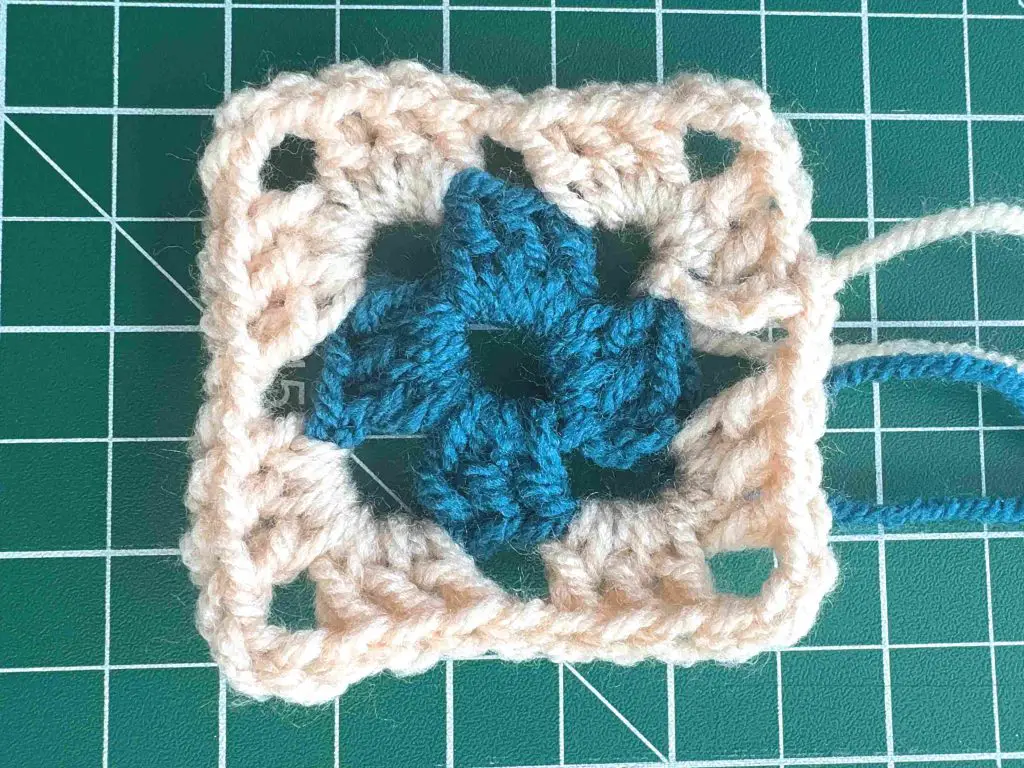
Keep working around the granny square in the same way. When you get back to where you started simply slip stitch into the top of the 3 chains and fasten off your yarn.
Weave all your ends in (I show this in the video if you have never done it before).
You have completed your first open granny square!
Abbreviated Instructions – UK Version
Round 1
- Ch 6, Sl st to close ring
- Ch 3 (this counts as your first tr).
- Work 2 tr into the ring.
- Ch 3.
- Work 3 tr into the ring.
- Ch 3.
- Work 3 tr into the ring.
- Ch 3.
- Work 3 tr into the ring.
- Ch 3.
- Sl st to the top of the initial ch 3 to join.
Round 2
- Ch 3 (counts as first tr).
- Work 2 tr in the same space (the ch-3 corner space).
- Ch 3.
- Work 3 tr into the same corner space.
- Ch 1.
- In the next ch-3 corner space, work 3 tr, ch 3, 3 tr (this creates a corner).
- Ch1
- Repeat in each of the remaining two ch-3 corner spaces.
- Sl st to the top of the initial ch 3 to join.
Round 3
- Ch 3 (counts as first tr).
- Work 2 tr in the same space.
- Ch 3.
- Work 3 tr into the same corner space.
- Ch1.
- Work 3 tr in the next ch-1 space.
- Ch1.
- Work 3tr, ch3, 3tr in the next ch-3 corner space.
- Continue around the square in the same way.
- Sl st to the top of the initial ch 3 to join.
US Version Instructions for Granny Square
Getting Started
I choose to start my granny squares with chain stitches but if your prefer you can use a magic ring. If you are doing this granny square exactly the same as me then do 6 chain stitches and join them with a slip stitch to form a ring.
Round 1
Work 3 chain stitches (these are your first ‘double crochet’). Work 2 double crochet stitches into the ring.
Then work 3 more chains and another 3 doubles into the ring
Repeat chain 3, double crochet 3 twice more. Then slip stitch into the top of the first 3 chain stitches to complete the round. You should have 4 corners made using your 3 chain stitches and 4 sides using your 3 doubles. Basically, you now have a square.
If you are swapping to a new colour, fasten off your yarn.
Round 2
Join your new colour yarn into any corner space. Work 3 chain stitches and 2 doubles as you did before. Then do 3 chains and 2 doubles into the same corner space to form your first corner of round 2.
Do 1 chain stitch and then work the next corner in the same way. So, do 3 doubles, 3 chains, 3 doubles into the next corner space.
Repeat this for all the corners. Then, chain 1 and slip stitch into the top of the first chain to complete round 2.
Round 3
This is the last round that I am showing you as every round after this is worked in exactly the same way.
Join your new yarn in any corner space. Work 3 chains, 2 doubles, 3 chains, and 3 doubles as you did when you started round 2.
Chain 1, work 2 doubles into the next chain space. Then chain 1 and work the corner space as before (3 doubles, 3 chains, 3 doubles).
Keep working around the granny square in the same way. When you get back to where you started simply slip stitch into the top of the 3 chains and fasten off your yarn.
Weave all your ends in (I show this in the video if you have never done it before).
You have completed your first open granny square!
Abbreviated Instructions – US Version
Round 1
- Ch 6, Sl st to close ring
- Ch 3 (this counts as your first tr).
- Work 2 dc into the ring.
- Ch 3.
- Work 3 dc into the ring.
- Ch 3.
- Work 3 dc into the ring.
- Ch 3.
- Work 3 dc into the ring.
- Ch 3.
- Sl st to the top of the initial ch 3 to join.
Round 2
- Ch 3 (counts as first dc).
- Work 2 dc in the same space (the ch-3 corner space).
- Ch 3.
- Work 3 dc into the same corner space.
- Ch 1.
- In the next ch-3 corner space, work 3 dc, ch 3, 3 dc (this creates a corner).
- Ch1.
- Repeat in each of the remaining two ch-3 corner spaces.
- Sl st to the top of the initial ch 3 to join.
Round 3
- Ch 3 (counts as first dc).
- Work 2 dc in the same space.
- Ch 3.
- Work 3 dc into the same corner space.
- Ch1.
- Work 3 dc in the next ch-1 space.
- Ch1.
- Work 3dc, ch3, 3dc in the next ch-3 corner space.
- Continue around the square in the same way.
- Sl st to the top of the initial ch 3 to join.
Frequently asked Questions
How long does it take to make a granny square?
The time it takes to make a granny square depends on your experience level and the size you’re making. A small, 3-round granny square like this one can usually be completed in under an hour (including weaving the ends in), especially once you get the hang of it. As you make more, you will get faster!
Why am I getting uneven edges?
Uneven edges can be a sign of inconsistent tension. Try to keep your tension relaxed and even. By that I mean keep feeding your yarn at a consistent rate and keep your stitches the same size. This gets easier the more you crochet.
Why am I getting tangled yarn?
Keeping your yarn in a consistent position while you work can help prevent tangles. If you are having trouble with the tails you have left simply weave them in as you go instead of waiting until you have finished the granny square. If you do encounter a tangle, carefully try to untangle it before continuing.
What are granny squares used for?
Granny squares can be used in so many projects including cardigans, jumpers, waistcoats, scarves, bags, coasters, purses, small toy animals, etc.
Are there different types of granny squares?
There are many different types of granny squares, including solid granny squares, flower granny squares, and more complex variations. This tutorial focused on the classic open granny square, which is a great place to start your granny square journey.
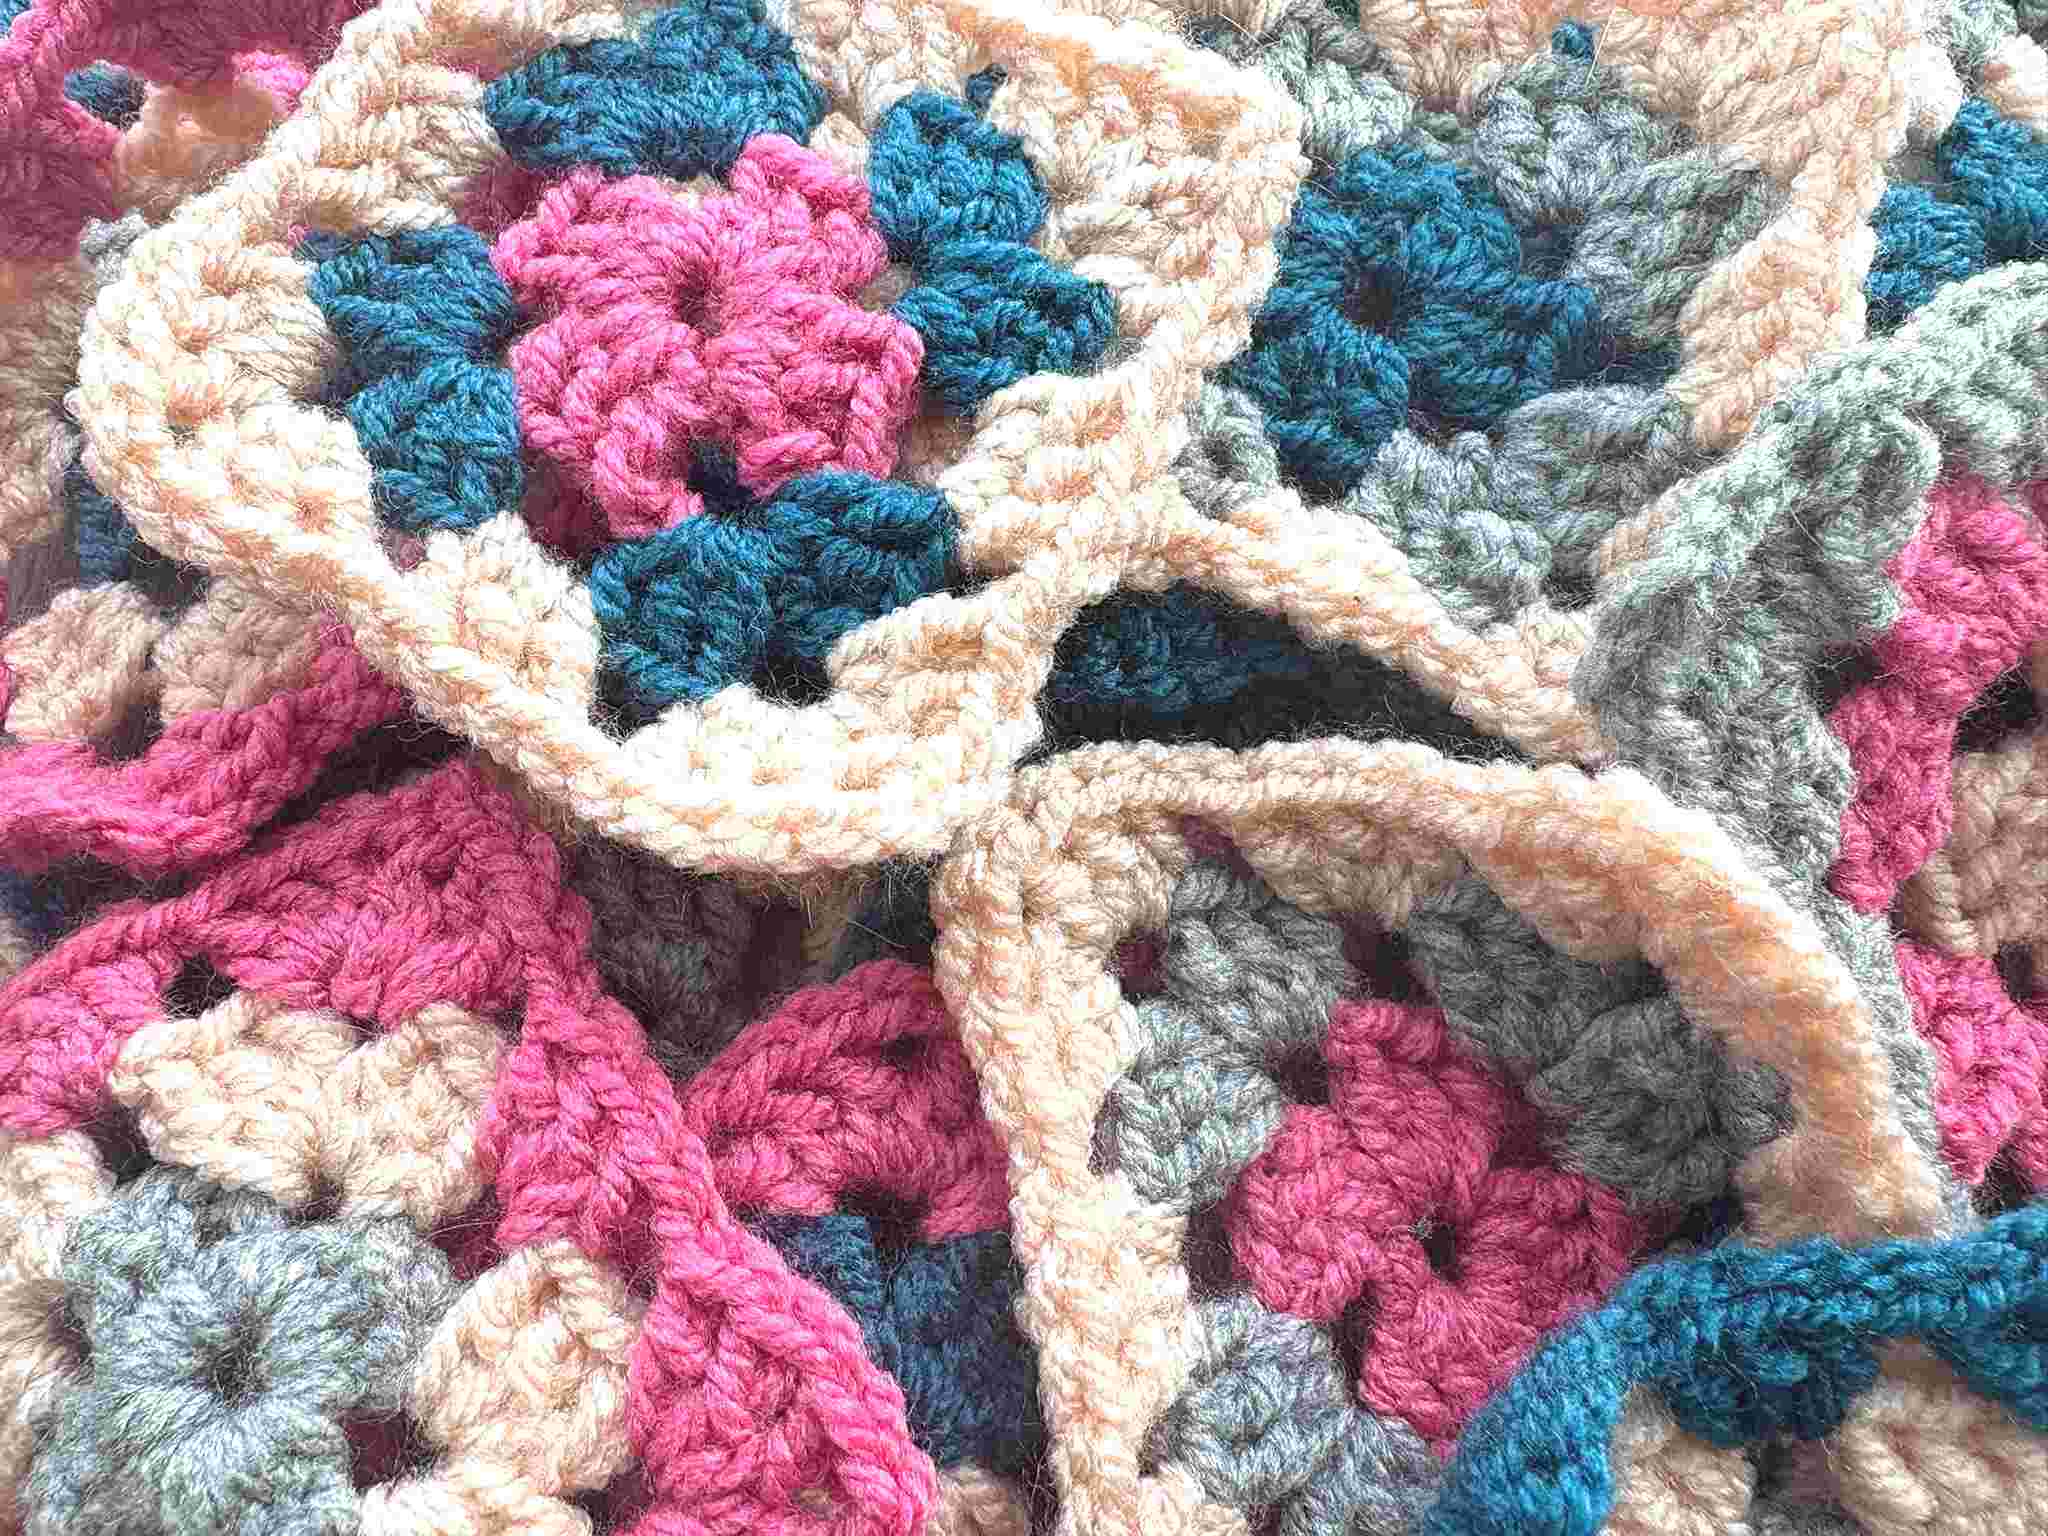
My Favourite Granny Square Project
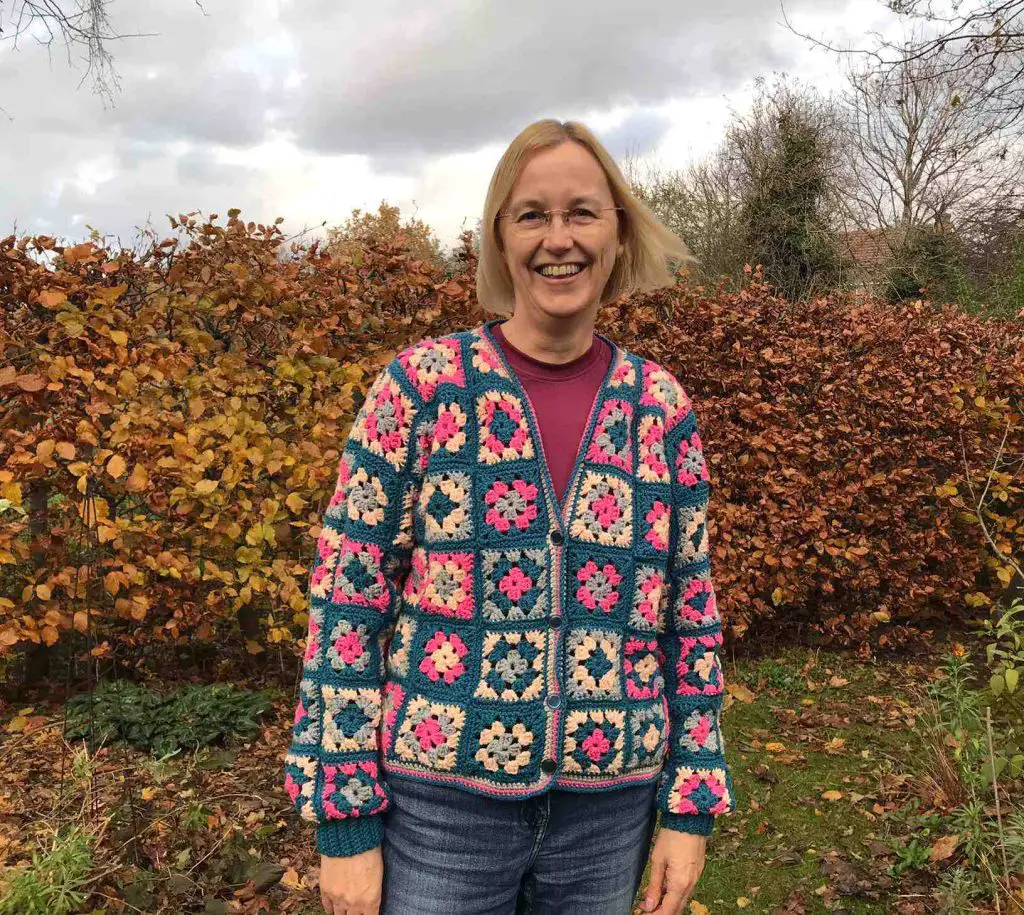
This is my favourite item that I have made with open granny squares so far! No pattern needed!
And next …
There is so much more to learn with crochet and I have a few tutorials on this site to help you. You can find them all in the crochet section. I recommend having a look on Pinterest for loads of inspiration and you can pin this while you are there so that you can find it again.